
Step 1: Choose Your Destination (Be Brutally Realistic)
Your first domestic backpacking trip is not the time to test your physical limits on a grueling multi-day major climb like Mount Halcon or Mount Kanlaon. Those mountains will still be there after you have sharpened your skills. The goal of your first overnight trek is far more important: master your gear, dial in your camp routine, understand how your body reacts to trail conditions, and actually enjoy the mountain. Arriving at camp exhausted, wet, and overpacked on your first trip is one of the fastest ways to never go backpacking again. Choose a trail that lets you succeed, not one that tests your survival instincts on day one.
When researching trails on local mountaineering blogs or apps like AllTrails, filter your search using strict beginner parameters. Look for trails classified by local Philippine hiking communities as Minor Climbs with a difficulty of 3 out of 9 or lower. Target a simple 2-day, 1-night (2D1N) itinerary as your first objective — enough time to experience a genuine overnight wilderness camp without overextending yourself. Most critically, choose a trail with a guaranteed designated water source such as a clean mountain spring or river stop along the route. Carrying multiple days’ worth of water weight under the hot Philippine sun is an absolute backbreaker that beginners consistently underestimate. For additional inspiration on what regions offer the most rewarding beginner experiences, see our guide to Best Places in Luzon for First-Time Visitors.
The table below outlines three excellent beginner-appropriate mountains across different regions of the Philippines. Mt. Pulag via the Ambangeg Trail in Benguet is the Philippines’ most beginner-friendly high-altitude experience — the trail is well-graded, wide, and heavily regulated, and the iconic sea of clouds above the dwarf bamboo slopes is one of the most photographed sights in Philippine mountaineering. Mt. Daraitan in Tanay, Rizal combines a manageable difficulty rating with the stunning reward of the Tinipak River and dramatic limestone formations — and it is close enough to Metro Manila for a quick Friday-night departure. Mt. Apo via the Kidapawan Trail is technically a major climb and should only be attempted by first-timers if you restrict your itinerary to the lower camps and do not push for the summit on your inaugural trip.
Whatever mountain you choose, always research it through multiple recent sources. Trail conditions in the Philippines change dramatically between the dry Tag-araw season and the wet Habagat monsoon season. A trail that is moderate in February can become treacherous and impassable in August. Check the Facebook pages of local mountaineering clubs in the target region for the most recent trip reports, and always verify current trail conditions with your assigned guide before setting off from the jump-off point.
| Mountain & Location | Difficulty | Key Highlight | Best Season |
|---|---|---|---|
| Mt. Pulag (Ambangeg Trail) Benguet |
Minor Climb (2/9) | Iconic Sea of Clouds & dwarf bamboo slopes | November–February |
| Mt. Daraitan Tanay, Rizal |
Minor Climb (4/9) | Limestone formations & pristine Tinipak River | January–April |
| Mt. Apo (Kidapawan Trail) Cotabato / Davao |
Major (6/9 — lower camps only) | Volcanic vents & Lake Venado | March–May |
Step 2: Lock Down Permits and Local Guides Early
Unlike Western countries where you can freely roam open wilderness areas, mountaineering in the Philippines is strictly regulated by Local Government Units (LGUs), Department of Environment and Natural Resources (DENR) offices, and Indigenous Cultural Communities (ICCs). This system exists for good reasons — it protects fragile ecosystems, limits trail degradation from overcrowding, ensures hiker safety through official maritime and overland manifests, and channels tourism income directly into local communities. Understanding and respecting this system is not optional; it is the foundation of responsible Philippine mountaineering.
Popular mountains like Mt. Pulag have strict daily hiker caps enforced by the Benguet provincial government and DENR. Slots fill up weeks in advance, especially during peak season (November through February for the cold season mountains). You must secure your climb permit through the respective municipal tourism office or Protected Area Management Board (PAMB) well ahead of your target date. Permits typically cost ₱50–₱200 per person depending on the mountain and the protected area classification. Do not wait until the week before your trip — for popular mountains in peak season, waiting lists can stretch to months.
Almost all trails in the Philippines require you to hire an accredited local guide. This is not a tourist convenience — it is a mandatory safety and cultural regulation. Local guides know the trails intimately, can navigate in low-visibility fog and rain, carry emergency communication equipment, understand wildlife hazards like limatik (blood leeches) and unstable trail sections, and provide a critical economic lifeline for mountain communities. Guide fees typically run ₱500–₱1,500 per day depending on the mountain and guide level. Do not attempt to self-guide unless the trail explicitly permits it — and very few do.
If you are catching a domestic flight to reach your jump-off point — for example flying Manila to Davao or Cagayan de Oro for a Mindanao trek — bring a valid government-issued ID whose name exactly matches both your flight booking and your mountaineering permit registry. Discrepancies in names between your permit and your ID can cause issues at the registration desk. Budget for bus or van transport from the airport to the jump-off municipality, which can cost an additional ₱150–₱500 depending on distance. For more on budgeting domestic travel within the Philippines for adventure trips, our Baganga Budget Travel Guide covers practical transport cost strategies for remote Mindanao destinations.
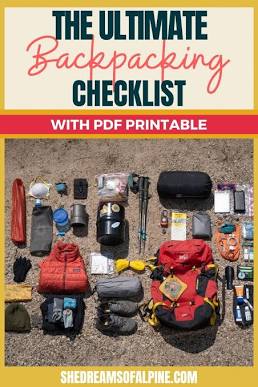
Step 3: Dial In Your Gear — The Tropical “Big Three”
In the global backpacking community, your shelter, your sleep system, and your backpack are known as the “Big Three” because they constitute the heaviest and most critical items in your pack. Getting these three right determines whether your first backpacking trip is a comfortable adventure or a brutal physical ordeal. In the Philippines specifically, each of these three items requires tropical adaptations that standard gear guides from North American or European sources will not adequately cover. High humidity, torrential monsoon rain, heat that persists even at altitude during shoulder season, and near-freezing cold at higher elevations in peak season all demand deliberate gear choices.
Your Backpack (45L to 60L): For a 2D1N or 3D2N Philippine mountain trip, a 45- to 60-liter internal frame backpack is the sweet spot. Crucially, backpacks are fitted to your torso length, not your overall height — make sure the pack transfers weight onto your hip belt rather than pulling down on your shoulders. The single most important tropical adaptation for your pack is waterproofing. Ensure your pack comes with a high-visibility rain cover, or line the inside with a heavy-duty garbage bag to keep dry clothes completely sealed against sudden Habagat downpours. A wet sleeping bag at 2,500 meters above sea level is not just uncomfortable — it is a hypothermia risk.
Your Shelter (Double-Layer Tent): Never use a single-layer, cheap beach tent in the mountains. You need a freestanding, double-layer tent with a full-coverage rainfly. The inner mesh layer keeps out tropical insects and mosquitoes while allowing air circulation to combat the intense nighttime humidity that causes condensation buildup inside single-wall tents. The outer rainfly must extend fully to the ground on all sides to handle the sideways rain that accompanies Philippine mountain storms. Budget Philippine mountaineering tents from brands like Naturehike or Hewolf available in local outdoor shops provide adequate performance for ₱1,500–₱3,500.
Your Sleep System: You might assume the Philippines is always hot, but mountain temperatures at higher elevations can drop to near-freezing single digits at night — particularly on Mt. Pulag (2,922m), Mt. Dulang-Dulang (2,938m), and Mt. Apo (2,954m). For high-altitude climbs, bring a lightweight compact sleeping bag rated to at least 5°C, or a thermal fleece liner inside a lighter bag. For warmer, lower-elevation ridge camps below 1,500m, a light travel blanket or malong (traditional Filipino woven sarong) may suffice on still nights. Never skip a sleeping pad — it insulates your body from the damp, cold tropical ground and reduces heat loss far more effectively than an extra blanket. A lightweight inflatable pad or a closed-cell foam pad both serve well.
Step 4: Use This Interactive Base Weight Calculator
Before you pack your bag, use our custom calculator below to audit your “Base Weight” — the weight of all your gear excluding consumables like food, water, and fuel. Your base weight is the single most useful number for predicting how comfortable your body will feel after six hours on a steep, slick Philippine mountain trail. Aim to keep your total base weight under 20 lbs (approximately 9 kg) for a comfortable, injury-free journey up the ridges.
🎰 Trail-Ready Base Weight Calculator
Adjust the weights (in lbs) of your gear to analyze your pack category.
3.5 lbs
2.5 lbs
1.2 lbs
3.0 lbs
3.5 lbs
Step 5: Plan High-Calorie Meals and Tropical Water Safety
You will burn thousands of calories climbing slick, muddy trails and steep ridgelines under a Philippine mountain sun. Trail nutrition needs to be efficient, lightweight, quick to cook, and highly resilient to tropical heat and humidity. The cardinal sin of the Filipino beginner backpacker is over-packing canned goods — sardines, corned beef, and processed meat in heavy tin cans are among the most common and most punishing weight mistakes on a first trip. A single can of sardines weighs roughly 150–200 grams. Multiply that across three meals for two days and you have added nearly a kilogram of food weight that mostly consists of water and tin.
The smarter strategy is to opt for dehydrated or instant meals that are light, high-calorie, and culturally appropriate for the Filipino palate. Pinoy trail staples include instant pancit canton (one pack weighs just 65 grams and provides 300 calories), foil-packed tuna (lighter than canned), quick-cook rolled oats with powdered milk for breakfast, peanut butter sachets on crackers for high-calorie snacking, dried mangoes and cashews for trail energy, and commercial energy bars. If you are bringing rice — a near-universal requirement for Filipino mountaineers — portion it out beforehand in individual Ziploc bags so you carry exactly what you will consume and nothing more. Pre-cooking rice at home and bringing it packed in a food-safe bag works well for short 2D1N trips.
Water safety is a non-negotiable priority on Philippine mountain trails. Never drink directly from a mountain stream without treating it, no matter how crystal clear it appears. Water sources near trails can be contaminated by wildlife upstream, decomposing organic matter, upstream campsites, or agricultural runoff even on protected peaks. Your primary filtration tool should be a hollow-fiber membrane filter like the Sawyer Squeeze or an equivalent gravity filtration system — these are available in local outdoor shops in Manila for ₱800–₱2,500. As an emergency failsafe, always carry water purification tablets (iodine or chlorine dioxide) or a small dropper bottle of unscented household bleach in your first aid kit.
Plan your water consumption carefully against the confirmed water sources on your trail. A standard adult hiker requires a minimum of 3–4 liters of water per day on a moderate trail in Philippine conditions — more during hot season or on exposed ridges with no shade cover. Map your confirmed spring or river stop locations against your daily itinerary and know exactly how much water you need to carry between each source. Starting a long waterless section with less than 2 liters per person is a mistake that can quickly turn dangerous, especially on trails with no emergency access. For detailed regional travel and logistics planning for adventure trips in the Philippines, see also our Camiguin Island Travel Guide and Sambawan Island & Biliran Guide for adventure-focused itinerary examples.
Step 6: Master Backcountry Safety & Leave No Trace (LNT)
True backcountry safety depends entirely on preparation completed before you step away from cellular coverage. Once you are deep in a Philippine mountain valley, you have no Google Maps, no ride-sharing, no instant medical access, and no weather app. The decisions you make in the 48 hours before your trailhead departure — downloading offline maps, briefing your emergency contact, checking weather forecasts, studying your trail profile — are the decisions that determine how safe your trip will be. Emergency response times in remote Philippine mountain areas can range from several hours to over a day, so preventing problems is exponentially more important than reacting to them.
Cell service is non-existent deep within most Philippine mountain valleys. Download detailed topographical maps of your trail on apps like Gaia GPS or AllTrails Pro while you still have home Wi-Fi, and save them for offline use. Study the trail profile — know exactly how many kilometers you will cover each day, where the major elevation gains are, where the designated camp sites are, and where your water sources appear along the route. Brief a trusted person at home about your full itinerary: jump-off point, trail name, expected return date and time, guide’s contact number, and the LGU office where you registered. Agree on a check-in system — for example, you will text them the moment you reach the trailhead and again when you return to cell coverage.
One uniquely Philippine wildlife hazard that surprises nearly every first-time mountain hiker is the limatik — a small brown blood leech found in the moist, mossy forest floors of many Philippine mountains, particularly during the rainy season. Limatik attach to exposed skin, work through small gaps in footwear and clothing, and feed painlessly (you often do not feel them attaching). Do not panic — their bite is not dangerous, though the wound may bleed after they detach. Pack a small spray bottle of rubbing alcohol or saltwater to get them to detach safely without pulling them off manually. Wearing long socks tucked over the cuffs of your pants, and applying insect repellent to your footwear and lower legs, significantly reduces limatik exposure.
The Philippines faces massive and growing environmental challenges with trail pollution. Irresponsible hikers leave candy wrappers, food packaging, wet wipes, and human waste near water sources — damage that accumulates into serious ecological harm on fragile mountain ecosystems. Adhere strictly to Leave No Trace (LNT) principles: pack out absolutely everything you pack in, including orange peels and other organic waste that does not decompose quickly in the tropics; use designated toilet areas and bury human waste at least 200 feet from water sources and trails; never pick plants, carve trees, or disturb wildlife; and respect local community customs, particularly when crossing ancestral domains of indigenous peoples whose communities depend on and protect these mountains. If you see other hikers littering, model the correct behavior — pick it up yourself and pack it out. Check our Siquijor Travel Guide for more on responsible tourism practices across Philippine natural environments.
💰 6 Proven Ways to Save Money on Your First Philippine Backpacking Trip
Philippine mountain backpacking is already one of the most affordable outdoor adventure activities in Southeast Asia — but these six strategies can reduce your total trip cost by 30 to 50 percent without cutting corners on safety or experience.
Buying a full backpacking kit before your first trip can cost ₱5,000–₱15,000. Renting the Big Three (pack, tent, sleeping bag) from jump-off town gear shops costs ₱300–₱600 total for a 2D1N trip. Rent for the first trip, experience what you actually need, then invest in gear that fits your style. You will make far smarter purchase decisions after one real trail experience than from online research alone.
Guide fees are per group, not per person — a guide fee of ₱800 split among four people is just ₱200 each. The same applies to chartered jeepney or van transport to the jump-off point. Joining an organized group climb through a mountaineering club dramatically reduces per-person transport and guide costs compared to going as a solo traveler or small duo. Look for scheduled group climbs on Facebook groups for your target mountain at least three to four weeks in advance.
Sari-sari stores near jump-off points sell trail food at inflated prices. Buying instant noodles, foil tuna, rolled oats, and trail snacks at SM Supermarket or Puregold before departing for the mountain saves 30 to 50 percent on food costs. Pack two days’ worth of food per person in a single Ziploc freezer bag per day — pre-portioned and pre-sorted — so you never have to dig through your pack for individual items on trail. A full 2D1N food supply for one person costs ₱300–₱500 when purchased this way.
Private van transfers from airports or bus terminals to mountain jump-off towns are convenient but expensive — sometimes ₱1,500–₱3,000 per group one-way. Public Ceres buses, Victory Liner, or ordinary jeepneys cover the same routes for ₱100–₱300 per person. For Mt. Pulag, for example, a public bus from Baguio City to La Trinidad costs just ₱30, followed by a jeepney to Ambangeg for ₱50–₱80. The journey takes longer but saves thousands for a group of four.
Weekend climbs on popular mountains like Pulag and Daraitan are crowded, noisier at campsites, and have more competition for permit slots. Weekday climbs — departing on a Wednesday or Thursday — give you the mountain almost to yourself, better permit slot availability, and sometimes lower guide rates since guides are competing for fewer bookings. If your schedule allows, a mid-week first backpacking trip is a genuinely superior experience in almost every way: quieter trails, less crowded camps, and a far more immersive wilderness feeling.
Wood fires are prohibited on almost all regulated Philippine mountains and can result in immediate expulsion from the trail. A compact gas canister stove (isobutane) from brands like Trangia or cheap Chinese alternatives available at Quiapo or online for ₱350–₱800 is the standard cooking solution. A single 110g gas canister (₱120–₱200) lasts a full 2D1N trip for two people cooking instant meals. Stoves are also significantly faster than building fires, saving daylight hours for hiking and exploration. Many local mountaineering clubs lend stoves to members for free — ask before buying. For broader adventure travel gear and budgeting tips across the Philippines, see our Budget Island Hopping Palawan guide for cross-applicable outdoor cost-saving strategies.
❓ Frequently Asked Questions
🇵🇭 Your First Philippine Mountain Is Waiting — Go Meet It
This guide has covered the complete six-step roadmap for your first Philippine backpacking trip: how to choose the right beginner mountain with realistic difficulty parameters; how to secure DENR permits and accredited local guides weeks in advance; how to build a tropical “Big Three” gear system adapted for Philippine humidity, heat, and cold; how to calculate your base weight using our interactive tool; how to plan high-calorie trail food and safe water management; and how to master the backcountry safety protocols and Leave No Trace principles that protect both you and the mountain.
The mountains of the Philippines — from the mossy Cordillera ridgelines of the north to the volcanic peaks of Mindanao in the south — represent one of the most extraordinary and accessible outdoor adventure environments in all of Asia. Unlike heavily commercialized global trekking destinations, Philippine mountains are still largely explored by small groups of local hikers who treat the trails with deep respect and genuine reverence. Your first overnight trek will connect you to a community of people who love this archipelago in its most raw and beautiful form.
Pack your base weight under 9 kilograms. Secure your permit early. Trust your guide. Carry your trash out. And when you reach your first mountain summit at dawn with the sea of clouds stretching below you in every direction — you will understand exactly why Filipino mountaineers keep going back. Mabuhay ang mga bundok ng Pilipinas!